![]() See how the Audacity recording on microphone is done. You will need to see how to setup your computer so you can record your voice on the microphone. This is not the same as recording audio from your computer. The microphone setup as shown below. Connect the microphone, select the microphone and then recording it.
See how the Audacity recording on microphone is done. You will need to see how to setup your computer so you can record your voice on the microphone. This is not the same as recording audio from your computer. The microphone setup as shown below. Connect the microphone, select the microphone and then recording it.
Audacity Recording on Microphone
First you will need to connect your microphone to your computer. Plug this into the correct port and then test your microphone. Some are a USB plug but many of the Asian versions use the USB only to power up the lights on them. They still use the standard microphone and earphones port. The 3.5mm jack is still standard. For those who have an XLR mic you will need to plug this into your XLR-USB port. Note that before you start to ensure that you have completed the Audacity install and that you have also completed the FFMpeg install for Audacity as well. The microphone setup will not work without it. If you don’t see a signal when you test the microphone then see how to disable audio enhancements.
Select the Microphone
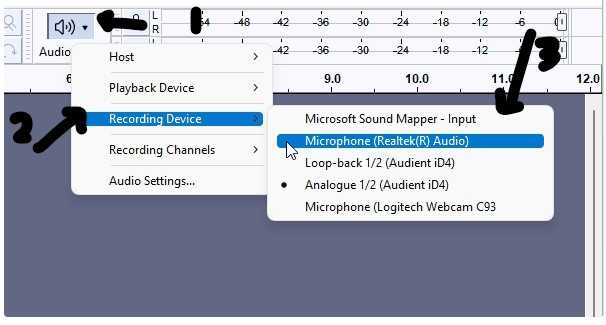
Once your microphone is connected. You can then open Audacity Audio and then Click on the symbol as seen at the top market as #1. The new menu will open. There you will need to Click on “Recording Device”. The new menu that open your will need to find your microphone. Most of these use a RealTek audio board from their motherboards. Most likely so does yours. Some have the microphone built into their Webcams. Much like above your might be a Logitech Webcam as seen above. Once this done you will need to select your Audio Setup as well. You can also see the AVC1 Codec download on here.
Audacity Audio Setup
This is how to setup the audio in Audacity. Is this a recording in Stereo or Mono Channel.
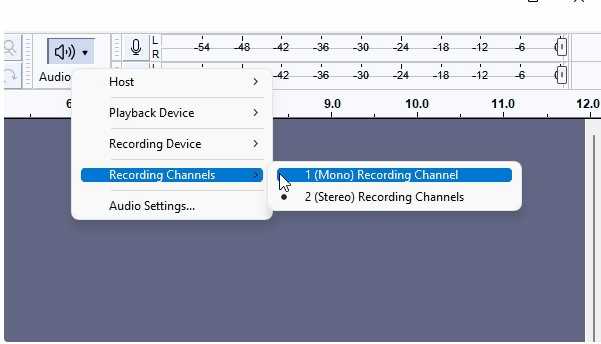
Much like the microphone setup. You will need to Click on the symbol as shown. Then Click on “Recording Channels”. From there Click on “Mono” if that is how you wish to record your audio. You will note that most microphones on the market are “Mono” microphones. This type of microphone does not make use of directionality when recording.
Test the Audio Setup
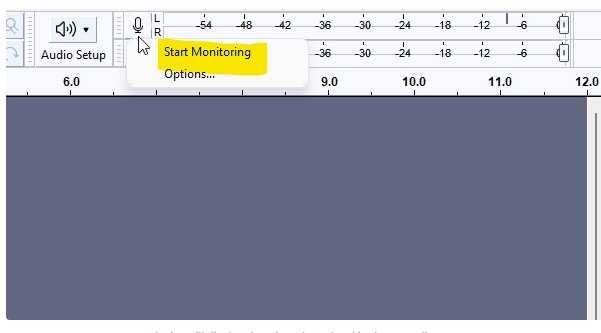
In order to test the microphone in Audacity you will need to Click on the symbol as seen above where there is a microphone. From there Click on the “Start Monitoring” option. Now speak into the mic and see if the audio bars are moving. Once you see them move you know that Audacity Audio can hear your microphone. Ensure that the bars don’t go into the red as the audio is too loud. Speak normally and see your best settings for your voice as well as for your microphone.
Saving your Audio Settings
When you are done you can export or save your audio recording. First you might want to save your settings and the project itself. Go to the top of the menu and then Click on File > Save Project menu.
- Save Project (
Ctrl+S/Cmd+S) this will now save your current project. The first time you will need to specify where it needs to be saved. After that the next project will save it in the same place as the first time.
- Save Project As this will save your project in a new place and continue editing on it
Try not to save the settings onto a USB drive as it requires a fast write. It may give you an error otherwise.
Exporting your Audio
To export your audio you will need to ensure that you have installed FFMpeg as some of the features for export might be available to you. See on the other page as to how to install FFMpeg for Audacity on this website. You can see how to do it there from inside Audacity or from the outside of the program. Note that any muted track will not be exported.
- Export as MP3, Export as WAV and Export as OGG will export your audio into the selected format.
- Export Selected Audio will export only the current selection time range, instead of the entire project.
- Export Multiple (
Ctrl+Shift+L/Cmd+Shift+L) will let you export different parts of the audio based on either tracks or labels.
![]()
